
1. Introduction
1.1 What is CampSecure™?
CampSecure™ is a smart alarm system for motorhomes, caravans and camping vehicles. The app monitors your vehicle using sensors and notifies you by email when it detects suspicious activity. The main benefit: in an alarm you always get a full status report with a photo by email, so you can assess the situation remotely.
1.2 Main features
- 🚨 Smart alarm with motion detection and sound analysis
- 📍 GPS location on alarm (one-shot for theft protection)
- 📧 Email notifications with photo and GPS coordinates
- 🔋 Battery monitoring with email warnings
- 📷 Automatic photos on alarm
- 📧 Email remote control (turn alarm off by email, request status report)
- 📬 Daily status email with photo, battery and location (time-based)
- ⚙️ Adjustable sensitivity (motion & audio)
CampSecure in the subject—otherwise it is ignored.
Full details and examples: chapter 5.3.
1.3 System requirements
- Android version: 10.0 (API 29) or higher
- Permissions (overview):
| Permission | Purpose | Grant? |
|---|---|---|
| Camera | Take alarm photos | Yes (required) |
| Microphone | Sound detection / audio monitoring | Yes (required) |
| Location (precise & approximate) | GPS on alarm, location in emails | Yes (required) |
| Notifications | Alarm hints, foreground service when needed | Yes (required) |
| Internet & network status | Email sending, email remote control (IMAP/SMTP) | Handled automatically at install |
| Foreground service (camera/mic/location) | Background monitoring with photo, sound, GPS | Android may show this when alarm is active |
| Start after reboot | Alarm active again after reboot (if it was armed) | Automatic |
| Ignore battery optimisation | So the alarm runs reliably in the background | Strongly recommended (in expert mode) – on many vendors (Xiaomi, Huawei, OnePlus, Samsung) the app is otherwise killed in the background |
Reference devices, phone prep, power & SIM: Detailed tips in our guides Old phone as alarm and Power & SIM for alarm phone.
2. Installation & first steps
2.1 Install the app
- Download the CampSecure™ app from the Google Play Store
- Open the app after installation
- Grant the required permissions when Android asks:
- Camera – for alarm photos
- Microphone – for sound detection
- Location (precise & approximate) – for GPS on alarm
- Notifications – for alarm hints
- Under Settings → Expert mode, tap “Open battery optimisation” and set CampSecure™ to “Don’t optimise” so the alarm runs reliably in the background.
2.2 Initial configuration
After first launch, go through the following steps in this order:
- Wait for the device check:
- Wait until the device check directly under the header reports “System ready” (green) – see section 3.4.
- Resolve any reported issues first—e.g. missing permissions or active battery optimisation.
- Set device name:
- Open the “⚙️ Settings” tile on the dashboard
- Enter a name for your device (e.g. “My motorhome”)
- Configure email:
- See section 5: Email configuration
- Adjust sensitivity:
- Default: 5/10 (suitable for most situations)
- Adjust as needed (see section 4.2)
- Send test email:
- After email setup: use send test email (section 5.5) to verify SMTP and delivery.
- There is no test alarm—only the test email in settings.
- Mount the alarm phone: see section 2.3
2.3 Mount the alarm phone
The smartphone should reliably cover the relevant area:
- Position: opposite the door or with a good view of the interior.
- Mount: firm and vibration-safe (suction cup, magnetic, adhesive or tripod mount).
- Camera: main camera preferred—the entry and room should be in frame.
- Before arming: check the camera view; the display may stay off (expert mode: keep screen on = off recommended).
Power and optional SIM/Wi‑Fi: Power & SIM guide. Phone prep and reference devices: Old phone guide.
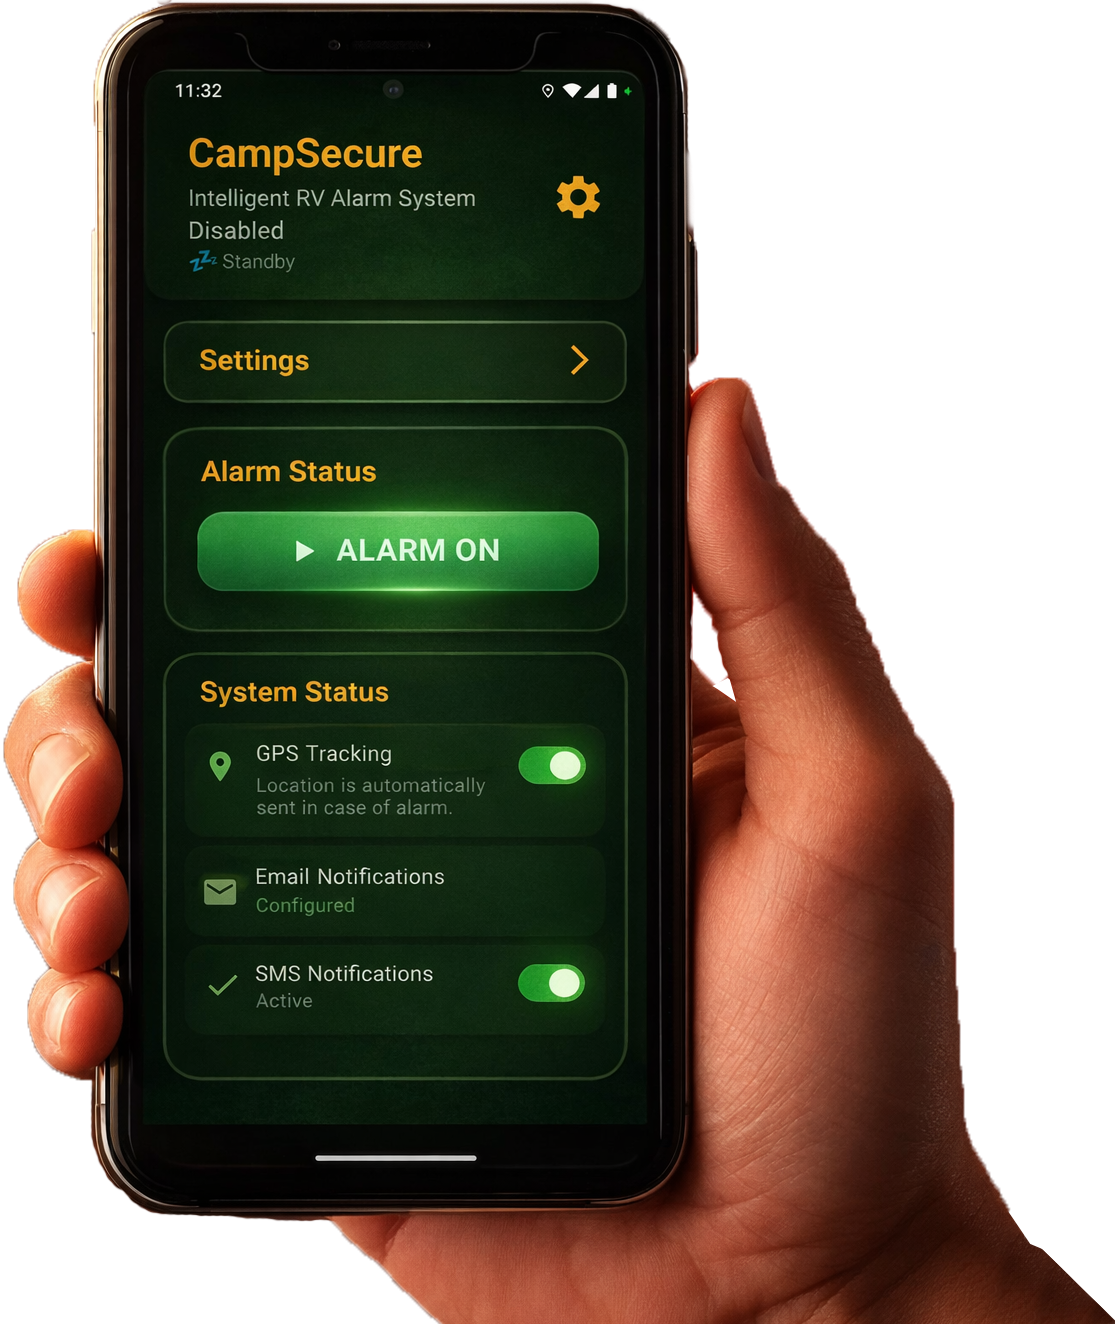
3. Dashboard (main screen)
3.1 Overview
The dashboard shows the key information at a glance:
Header area
- Device name: Your device’s name.
- Alarm status: Current alarm state.
- Power mode: Battery management state:
- 💤 Standby: power-saving mode
- 🔋 Active: normal mode
- ⚡ Alert: maximum monitoring
Alarm status section
- Alarm ON / OFF button: Arms or disarms the alarm.
- Countdown: Shows the delay when arming (if configured).
System status tiles
- 📍 GPS: GPS monitoring status.
- 📧 Email: Email configuration and remote-control status.
Note: Motion and audio monitoring no longer have their own tiles. Both run automatically as soon as the alarm is armed (state ARMED_STANDBY).
3.2 Arm / disarm the alarm
Arm the alarm:
- Tap the large “ALARM ON” button.
- If a delay is configured, a countdown runs.
- After the countdown the alarm is active.
Disarm the alarm:
- Tap the red “ALARM OFF” button.
- The alarm is disarmed immediately.
3.3 Open settings
- Tap the “⚙️ Settings” tile on the dashboard.
The header only shows the logo, device name and status—there is no separate gear icon in the top right anymore.
3.4 Device check (device compatibility)
Directly under the header, the dashboard automatically checks whether your device is suitable for CampSecure™. The check runs at app start and can be refreshed manually at any time.
- Status indicator:
- 🟢 System ready – the device is fully compatible.
- 🟡 Compatible with optimisation recommendations – operation is possible, but some items should be improved.
- 🔴 Not reliably supported – reliable alarm operation cannot be guaranteed.
- Device info: Android version and RAM size of your device.
- Sensor chips: camera, microphone, motion sensor, location – each with a check mark (✓) or a warning symbol (⚠️).
- Recommendations / issues: concrete hints, e.g. if battery optimisation is active, location was not granted, or RAM is tight.
- Action buttons (only shown when issues exist):
- “Open app settings” – jumps straight to the Android settings so you can grant missing permissions or change battery optimisation.
- “Refresh status” – re-runs the device check after you change a setting.
Official reference devices (Pixel, Samsung, Redmi, etc.): guide – reference devices.
4. Settings
Settings are split into several areas:
4.1 App settings
Device name:
- Name for your device (e.g. “My motorhome”).
- Shown in alarm emails.
Language:
- German: German user interface
- English: English user interface
- On the very first app launch, the language is selected automatically based on your device’s system language (German or English). You can change it manually at any time afterwards.
- The app uses the standard system language options. From Android 13 onwards you can also set the language per app system-wide.
- Changes apply immediately.
4.2 Sensors & alarm
Sliders are labelled “Low” / “High” (motion & audio) and “Short” / “Long” (delay) so you can see the direction of adjustment at a glance.
Motion sensitivity (0–10):
- 0: Home mode (motion ignored).
- 1–10: Vehicle mode (higher = more sensitive).
- Default: 5/10 (suitable for most situations).
- Low (1–3): Less sensitive (e.g. in strong wind).
- High (7–10): Very sensitive (e.g. on car parks).
Audio sensitivity (1–10):
- 1–10: Higher = more sensitive.
- Default: 5/10 (suitable for most situations).
- Low (1–3): Less sensitive (e.g. in noisy environments).
- High (7–10): Very sensitive (e.g. in quiet environments).
Alarm delay (1–60 seconds):
- Delay when arming the alarm.
- Gives you time to leave the vehicle.
- Default: 10 seconds.
- Recommendation: 10–30 seconds for motorhomes—depending on how long you need to leave the vehicle.
4.3 Email notifications
See section 5: Email configuration
4.4 Camera settings
This area contains all settings for alarm photos and the camera:
Camera selection for alarm photos:
- Main camera (rear): default, best quality for exterior shots
- Front camera: for inward-facing shots
- Note: Automatic flash (below) only works with the main camera.
Automatic flash in the dark:
- When enabled, the app fires a short flash in low light (below the set lux threshold) before taking the alarm photo.
- Only effective when using the main camera.
Lux threshold (only visible when the flash is enabled):
- Range: 5–50 lux.
- Default: 20 lux.
- Low values (5–15 lux): flash only fires in very dark surroundings.
- Higher values (30–50 lux): flash also fires in dim conditions.
Delete alarm images:
- Deletes all stored alarm photos.
- Warning: this cannot be undone.
Delete everything (factory reset):
- Deletes the alarm log, all alarm photos and all settings—including email configuration data.
- Stops the running monitoring service.
- The app is restored to its factory state.
4.5 Expert mode
See section 7: Expert mode
5. Email configuration
5.1 SMTP server (outgoing)
SMTP server:
- Your email provider’s outgoing server.
- Examples:
- GMX:
mail.gmx.net - WEB.DE:
smtp.web.de - Gmail:
smtp.gmail.com - Outlook:
smtp-mail.outlook.com
- GMX:
SMTP port:
- Usually 587 (STARTTLS) or 465 (SSL).
- Default: 587.
Email username:
- Your full email address or username (depends on the provider).
Email password:
- Your email password.
- For Gmail/Outlook with 2FA: use an app password.
From address:
- Filled in automatically from the email username and cannot be edited separately.
To address:
- Email address for alarm notifications.
- Can be the same as the from address.
5.2 IMAP server (remote control)
IMAP server:
- Server for receiving email commands.
- Examples:
- GMX:
imap.gmx.net - WEB.DE:
imap.web.de - Gmail:
imap.gmail.com - Outlook:
outlook.office365.com
- GMX:
IMAP port:
- Usually 993 (SSL).
- Default: 993.
5.3 Enable email remote control
Required: “CampSecure” in the email subject
Every remote-control email—including only ##status## or ##off## / ##aus##—is processed only if the word CampSecure appears in the subject (case-insensitive).
Without “CampSecure” in the subject → the email is ignored.
Subject examples:
CampSecure ##status##CampSecure ##off##CampSecurein the subject and##status##in the email body
Enable email commands:
- Turn on the “Enable email commands” switch.
- Enter at least one authorised email address in the whitelist.
- Optional: change the PIN (default: 0000).
Email whitelist:
- Comma-separated list of authorised email addresses.
- Only emails from these addresses are accepted.
- Example:
me@email.com, partner@email.com
Command keywords (copy exactly): Type these fixed tokens into the subject or body of your email. They must include the double hash marks ## as shown.
| Action | English keyword | German alias (same effect) |
|---|---|---|
| Disarm the alarm (turn monitoring off) | ##off## |
##aus## |
| Request a status report | ##status## |
— |
Email command PIN:
- Optional 4-digit PIN for extra security.
- Default 0000: the PIN check is disabled—the only protection is the whitelist.
- Custom PIN (e.g.
1234): must be included in every command email as##1234##, otherwise the command is discarded.
How to send a command:
- See the orange notice above:
CampSecuremust always be in the subject. - The command may also appear in the body of the email—as long as
CampSecureis in the subject. - With PIN (only if a PIN other than 0000 is set):
##off## ##1234##or##status## ##1234##(German alias:##aus## ##1234##). - Send the email from an address that is on the whitelist.
- Only unread emails from the last 24 hours are processed.
- Each email is processed only once (deduplicated via the Message-ID).
- The app polls the inbox every 15 minutes—only while the alarm is armed.
5.4 Battery warnings
- Email on low battery: enable/disable the switch.
- Threshold: 5–50% (default: 30%).
- An email is sent when the battery falls below the threshold.
5.5 Send test email
- Tap “📧 Send test email”.
- Checks the email configuration.
- Sends a test email with photo and GPS coordinates.
5.6 Push on your receiving smartphone
CampSecure™ sends alarms by email. To notice them immediately, your receiving smartphone (not the alarm phone) must show push notifications for new emails.
After setup: on the alarm phone, tap “Send test email” (Settings → Email notifications)—this checks that the email arrives and appears as a push on your phone. This is not a test alarm; no sensors are triggered.
Set up push in the mail app on the phone where you receive alarm emails.
6. Daily status email
The daily status email sends you one overview email per day—independent of alarm events. For email setup, see section 5.
6.1 Enable the feature
- Open Settings in the app.
- Enable the daily status email.
- Choose the time to the minute (hour 0–23, minute 0–59). Default: 08:00.
- Ensure SMTP is configured and the alarm is armed.
6.2 Email content
- Current photo from the selected camera (front or main camera, see section 4.4)
- Alarm phone battery level
- GPS coordinates with a Google Maps link
- Subject e.g. “Daily status – [date]”
6.3 Requirements & notes
- The feature must be enabled in settings.
- The alarm must be armed.
- An internet connection and working SMTP configuration are required.
- Maximum one email per day at the chosen time.
- The email is sent only if photo and GPS can be captured—otherwise no mail is sent that day.
- Alarm emails for events (motion, sound) are separate and sent immediately.
- On Android 12+, additional system settings (e.g. exact alarms) may be needed for reliable background operation.
7. Expert mode
7.1 System & operation
Keep screen on:
- When enabled, the screen stays on while the alarm is active
- Default: off (screen turns off)
- Recommendation: off for longer battery life
Open battery optimisation:
- Opens Android battery optimisation settings
- Important: the app should be set to “Don’t optimise” so the alarm works reliably in the background
Open app permissions:
- Opens Android app permission settings
- Check that all required permissions are granted
Camera selection, flash in the dark and deleting alarm images are under Camera settings (section 4.4).
7.2 Emergency
Force stop app:
- Fully stops the alarm monitoring service
- Only use in an emergency!
8. Troubleshooting
8.1 Alarm does not trigger
Possible causes:
- Sensitivity set too low.
- Motion sensitivity at 0 (home mode).
- Alarm not armed.
What to do:
- Check alarm status on the dashboard.
- Increase sensitivity in settings.
- Ensure motion sensitivity is > 0.
8.2 Email is not sent
Possible causes:
- SMTP configuration missing or wrong.
- No internet connection.
- Wrong email password.
What to do:
- Check SMTP settings.
- Send a test email.
- Check internet connectivity.
- For Gmail/Outlook with 2FA: use an app password.
8.3 Email remote control does not work
Possible causes:
- IMAP configuration missing or wrong.
- Email commands not enabled.
- No authorised address in the whitelist.
- Alarm not armed.
- The keyword
CampSecureis missing from the subject of the email. - The email is older than 24 hours—it is no longer processed.
- The email is already marked as “read” (e.g. by another mail client).
- A custom PIN is set (other than 0000) but not included in the subject/body.
What to do:
- Check IMAP settings.
- Enable email commands.
- Add your email to the whitelist.
- Make sure
CampSecureis in the subject. - Re-send the email if it is older than 24 hours or has already been read.
- If a custom PIN is set: add it in the format
##1234##. - Ensure the alarm is armed.
- Wait up to 15 minutes (polling interval).
8.4 Email arrives but no push on your phone
Possible causes:
- Push notifications disabled in your mail app.
- Android battery optimisation delaying the mail app.
- Push set up on the wrong device (alarm phone instead of receiving smartphone).
What to do:
- Enable push for new emails in your mail app on the receiving smartphone.
- Disable battery optimisation for the mail app.
- Send a test email from CampSecure and check for a push within a few seconds.
- See the push notification guide for GMX, Gmail, Outlook and WEB.DE.
8.5 No photo is taken
Possible causes:
- Camera permission missing.
- Camera hardware unavailable.
- Storage full.
What to do:
- Check camera permission.
- Check free storage.
- Test the camera in another app.
8.6 App stops in the background
Possible causes:
- Battery optimisation enabled.
- Android killing the app in the background.
What to do:
- Open “Battery optimisation” in expert mode.
- Set CampSecure™ to “Don’t optimise”.
- Check app permissions.
📞 Support
Questions or issues:
- Website: https://campsecure.app
- User guide online: https://campsecure.app/en/bedienungsanleitung.html
- German version: https://campsecure.app/de/bedienungsanleitung.html
Version: 1.0.0 (Build 8) | As of: May 2026